COMAC-in-a-Box
If you do not have the prerequisite hardware to install COMAC we have you covered. You can get a complete CORD system together with the CORD platform, OMEC, and an emulated data-plane using COMAC-in-a-Box (CiaB).
CiaB is a functional COMAC pod capable of running E2E tests. It takes about 25 minutes to install on a physical server or VM.
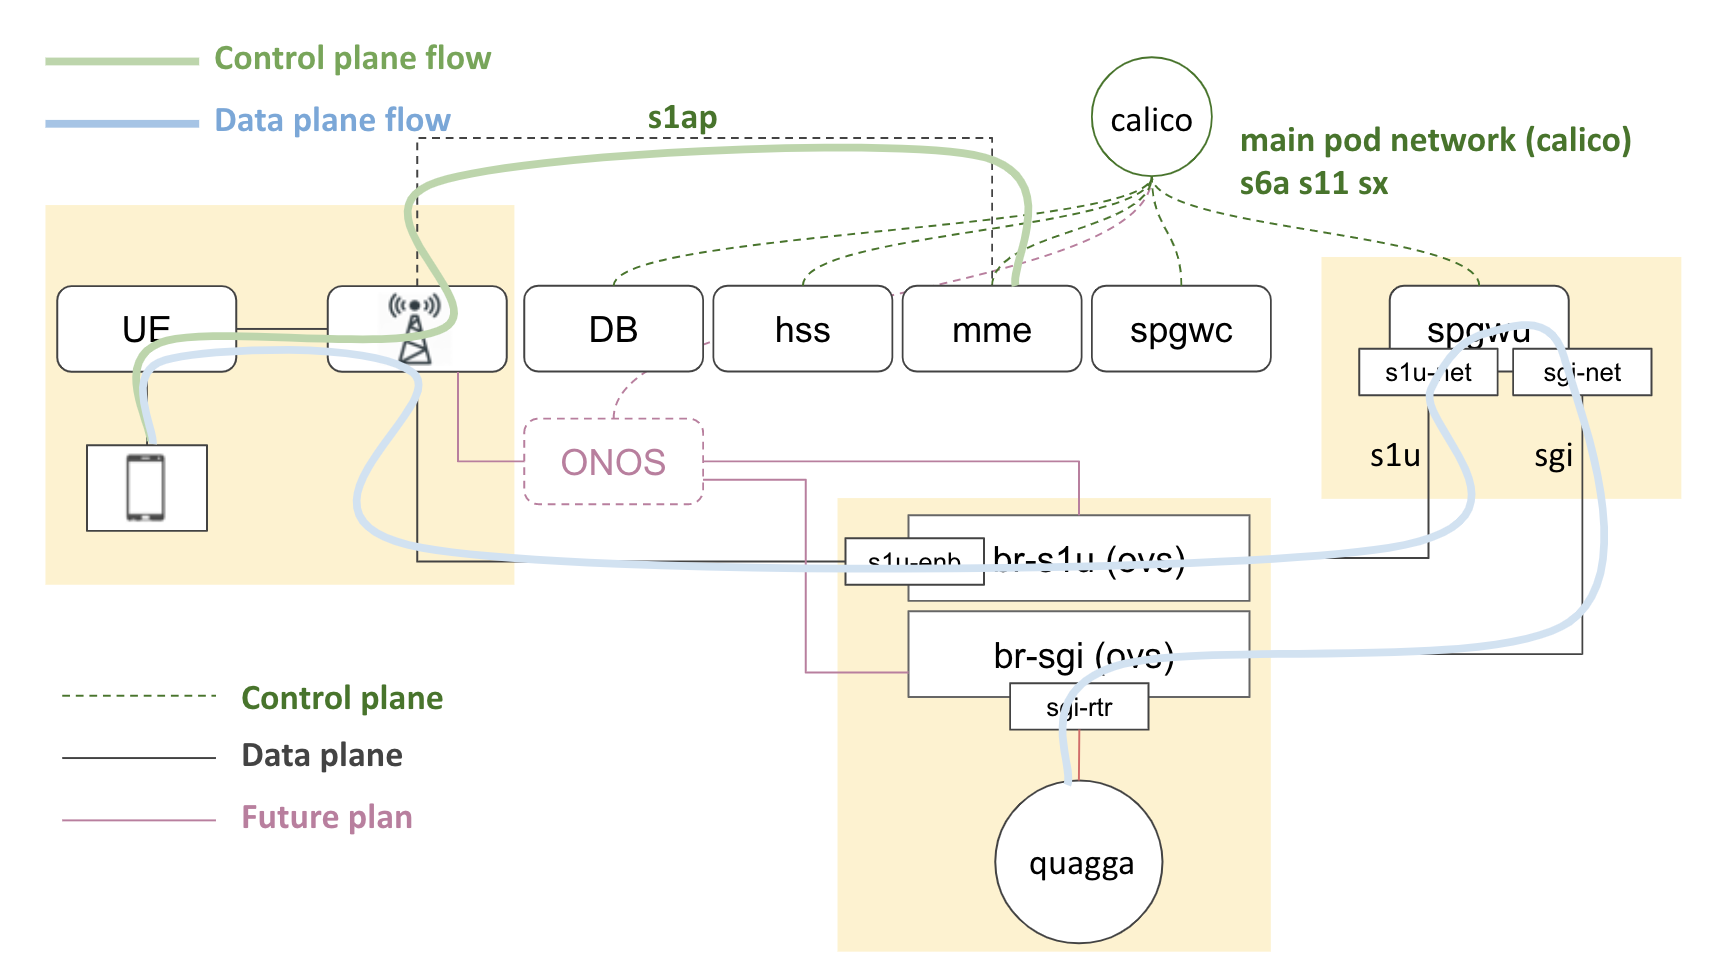
The default configuration of CiaB incorporates an emulated RAN provided by OpenAirInterface L2 nFAPI simulator and an emulated data plane switches provided by Open vSwitch. Open vSwitch is also configured with Quagga that stands in upstream router. The OAI simulator installs a single eNB and UE. The UE authenticates itself and attaches to the network through MME with subscriber information registered in HSS database, gets an IP address from SPGWC, and finally ping the upstream router. This demonstrates end-to-end connectivity between the UE and the upstream router via the eNB, SPGWU, and data plane switches.
Requirements
CiaB can be deployed on any x86 machine, either physical or virtual. The server of VM on which you are installing CiaB should have at least 4 cores of Intel Haswell or newer CPU, and 8GB of RAM, and 30GB disk space. Kernel version 4.15 or later is also required to run OAI simulator properly.
Quick start
A Makefile can be used to install COMAC-in-a-Box in an automated manner on an Ubuntu 16.04 or later system:
git clone https://gerrit.opencord.org/automation-tools
cd automation-tools/comac-in-a-box
make
make test
Installation procedure
The rest of this page describes a manual method for installing COMAC-in-a-Box. It also provides an overview of what is installed by each chart.
Kubernetes
Before installing COMAC, you need a Kubernetes cluster with Helm and a few other software packages. You also need to install Multus CNI plugin, enable SCTP support, and change the NodePort range. An easy way to set up a single-node Kubernetes that meets the requirements is with Kubespray.
Here’s an example of installing Kubernetes with Kubespray on an Ubuntu 16.04 and 18.04 server:
# Download Kubespray
cd ${HOME}
git clone https://github.com/kubernetes-incubator/kubespray.git -b release-2.11

# Create Python virtual environment for Kubespray
sudo apt update
sudo apt install -y software-properties-common python-pip
sudo pip install virtualenv
virtualenv ${HOME}/venv/ciab --no-site-packages
source ${HOME}/venv/ciab/bin/activate

# Run Kubespray
cd ${HOME}/kubespray
pip install -r requirements.txt
ansible-playbook -b -i inventory/local/hosts.ini \
    -e "{'override_system_hostname' : False, 'disable_swap' : True}" \
    -e "{'docker_iptables_enabled' : True}" \
    -e "{'kube_network_plugin_multus' : True, 'multus_version' : stable}" \
    -e "{'kube_apiserver_node_port_range' : 2000-36767}" \
    -e "{'kube_feature_gates' : [SCTPSupport=True]}" \
    -e "{'helm_enabled' : True}" \
    cluster.yml
deactivate

# Copy the cluster config to user home
mkdir -p ${HOME}/.kube
sudo cp -f /etc/kubernetes/admin.conf ${HOME}/.kube/config
sudo chown $(id -u):$(id -g) ${HOME}/.kube/config

# Init Helm and add additional Helm repositories
helm init --wait --client-only
helm repo add incubator https://kubernetes-charts-incubator.storage.googleapis.com/
helm repo add cord https://charts.opencord.org
Other prerequisites
Install the http and jq commands. Run: sudo apt install -y jq
Install additional CNI plugins.
cd ${HOME}
git clone https://gerrit.opencord.org/automation-tools
sudo cp ${HOME}/automation-tools/comac-in-a-box/resources/simpleovs /opt/cni/bin/

mkdir -p /tmp/cni-plugins
cd /tmp/cni-plugins
wget https://github.com/containernetworking/plugins/releases/download/v0.8.2/cni-plugins-linux-amd64-v0.8.2.tgz
tar xvfz cni-plugins-linux-amd64-v0.8.2.tgz
sudo cp /tmp/cni-plugins/static /opt/cni/bin/
Set up the emulated data plane which includes two OVS bridges and Quagga pod.
# Set up OVS bridges
sudo apt install -y openvswitch-switch
sudo ovs-vsctl --may-exist add-br br-s1u-net
sudo ovs-vsctl --may-exist add-port br-s1u-net s1u-enb -- set Interface s1u-enb type=internal
sudo ip addr add 119.0.0.4/24 dev s1u-enb
sudo ip link set s1u-enb up

# Set up Quagga
kubectl apply -f ${HOME}/automation-tools/comac-in-a-box/resources/router.yaml
kubectl wait pod -n default --for=condition=Ready -l app=router --timeout=300s
kubectl -n default exec router ip route add 16.0.0.0/8 via 13.1.1.3
kubectl delete net-attach-def sgi-net
Get CORD platform and COMAC Helm Charts
Before we can start installing COMAC components, we need to get the charts.
cd ${HOME}
mkdir -p cord; cd cord
git clone https://gerrit.opencord.org/helm-charts
git clone https://gerrit.opencord.org/cord-platform
Install CORD platform and COMAC profile
Run these commands:
cd ${HOME}/cord/cord-platform
helm dep update cord-platform
helm upgrade --install cord-platform cord-platform --set etcd-operator.enabled=false
cd ${HOME}/cord/helm-charts
helm dep update comac
helm upgrade --install comac comac --set mcord-services.fabric.enabled=false --set mcord-services.progran.enabled=false
You should see the following pods running about 5 min later. Note that the pods may periodically transition into error state. This is expected. They will retry and eventually get to the desired state:
$ kubectl get po
NAME                                                           READY   STATUS    RESTARTS   AGE
comac-base-kubernetes-tosca-loader-n8nzd                       1/1     Running   0          176m
comac-kubernetes-84f9f89d8f-k8khn                              1/1     Running   0          176m
comac-mcord-services-tosca-loader-p42pz                        1/1     Running   0          176m
comac-mcord-subscriber-m7gr2                                   1/1     Running   0          176m
comac-onos-service-549d79d695-gmd47                            1/1     Running   0          176m
cord-platform-elasticsearch-client-75c6846fc6-frw9q            1/1     Running   0          176m
cord-platform-elasticsearch-data-0                             1/1     Running   0          176m
cord-platform-elasticsearch-master-0                           1/1     Running   0          176m
cord-platform-elasticsearch-master-1                           1/1     Running   0          175m
cord-platform-grafana-7587c8fb49-2bx7k                         2/2     Running   0          176m
cord-platform-kafka-0                                          1/1     Running   0          176m
cord-platform-kibana-7888878b87-cjvh4                          1/1     Running   0          176m
cord-platform-logstash-0                                       1/1     Running   0          176m
cord-platform-nem-kpi-exporter-754697967b-29btr                1/1     Running   2          176m
cord-platform-nem-kpi-exporter-754697967b-wp29q                1/1     Running   2          176m
cord-platform-onos-798fb7f94f-cc862                            2/2     Running   0          176m
cord-platform-prometheus-alertmanager-5f559fbf5b-7pr56         2/2     Running   0          176m
cord-platform-prometheus-kube-state-metrics-67c78bcd9c-xxc2l   1/1     Running   0          176m
cord-platform-prometheus-node-exporter-jtw55                   1/1     Running   0          176m
cord-platform-prometheus-pushgateway-7c694f68b9-nlsqj          1/1     Running   0          176m
cord-platform-prometheus-server-78dfbc4f8b-fncts               2/2     Running   0          176m
cord-platform-zookeeper-0                                      1/1     Running   0          176m
router                                                         1/1     Running   0          5h26m
xos-chameleon-6754f7bcd8-cj95h                                 1/1     Running   0          176m
xos-core-5d67b6dc49-2tw7s                                      1/1     Running   0          176m
xos-db-66f95c59c7-hqqww                                        1/1     Running   0          176m
xos-gui-5ffb4b4474-q47tk                                       1/1     Running   0          176m
xos-tosca-f5468cc74-sm266                                      1/1     Running   6          176m
xos-ws-7746c588d9-74v28                                        1/1     Running   0          176m
Install OMEC
Befor releasing OMEC charts to the cluster, you will need to override some default values of OMEC charts for OMEC components to work properly with the OpenAirInterface simulator and the emulated data plane.
cd ${HOME}
cat >> omec-values.yaml << EOF
resources:
  enabled: false
cassandra:
  config:
    cluster_size: 1
    seed_size: 1
config:
  sriov:
    enabled: false
  spgwc:
    multiUpfs: false
  spgwu:
    multiUpfs: false
    devices: "--no-pci --vdev eth_af_packet0,iface=s1u-net --vdev eth_af_packet1,iface=sgi-net"
  hss:
    bootstrap:
      users:
      - imsi: "208014567891201"
        msisdn: "1122334455"
        apn: apn1
        key: "465b5ce8b199b49faa5f0a2ee238a6bc"
        opc: "d4416644f6154936193433dd20a0ace0"
networks:
  cniPlugin: simpleovs
  ipam: static
EOF
Release OMEC data plane and control plane with the override values above:
cd ${HOME}/cord/helm-charts/omec
helm upgrade --install omec-data-plane omec-data-plane --namespace omec -f ${HOME}/omec-values.yaml
helm dep up omec-control-plane
helm upgrade --install omec-control-plane omec-control-plane --namespace omec -f ${HOME}/omec-values.yaml
You should see the following pods running about 3 min later in omec namespace:
$ kubectl get po -n omec
NAME                      READY   STATUS      RESTARTS   AGE
cassandra-0               1/1     Running     0          3h
hss-0                     1/1     Running     0          3h
job-hss-bootstrap-22hnt   0/1     Completed   0          3h
job-hss-db-sync-bgfzj     0/1     Completed   0          3h
mme-0                     4/4     Running     0          3h
spgwc-0                   1/1     Running     0          3h
spgwu-0                   1/1     Running     0          3h
Build OpenAirInterface UE image
Run these commands to build OAI UE image:
cd ${HOME}
git clone https://github.com/opencord/openairinterface.git
cd ${HOME}/openairinterface
sudo docker build . --target lte-uesoftmodem \
    --build-arg build_base=omecproject/oai-base:1.0.0 \
    --file Dockerfile.ue \
    --tag omecproject/lte-uesoftmodem:1.0.0
Install OpenAirInterface simulator
Similar to OMEC, you will need to override some default values of OAI chart.
cd ${HOME}
cat >> oai-values.yaml << EOF
config:
  enb:
    mme:
      address: 127.0.0.1
    networks:
      s1u:
        interface: s1u-enb
  plmn:
    mcc: "208"
    mnc: "01"
    mnc_length: 2
  ue:
    sim:
      msin: "4567891201"
      api_key: "465b5ce8b199b49faa5f0a2ee238a6bc"
      opc: "d4416644f6154936193433dd20a0ace0"
      msisdn: "1122334456"
      sqn: "96"
EOF
Run these commands to install OpenAirInterface eNB and UE:
sudo ip addr add 127.0.0.2/8 dev lo
mme_iface=$(ip -4 route list default | awk -F 'dev' '{ print $2; exit }' | awk '{ print $1 }')

cd ${HOME}/cord/helm-charts
helm upgrade --install --namespace omec oaisim oaisim -f ${HOME}/oai-values.yaml --set config.enb.networks.s1_mme.interface=${mme_iface}
You should see enb-0 and ue-0 pods running about 3 min later in omec namespace:
$ kubectl get po -n omec
NAME                      READY   STATUS      RESTARTS   AGE
cassandra-0               1/1     Running     0          3h4m
enb-0                     1/1     Running     0          96s
hss-0                     1/1     Running     0          3h4m
job-hss-bootstrap-22hnt   0/1     Completed   0          3h4m
job-hss-db-sync-bgfzj     0/1     Completed   0          3h4m
mme-0                     4/4     Running     0          3h4m
spgwc-0                   1/1     Running     0          3h4m
spgwu-0                   1/1     Running     0          3h4m
ue-0                      1/1     Running     0          96s
ue-setup-if-8htjr         0/1     Completed   0          107s
Validating the install
Attach UE to the network
Once ue-0 pod is up and running, it immediately sends an attachment request to
the network. You can varify the success of the attachment by checking the IP
address of oip1 interface, which represents an UE. If the oip1 interface is
assigned an IP address, you could consider the attachment was successful.
ip addr show oip1
186: oip1: <BROADCAST,MULTICAST,NOARP,UP,LOWER_UP> mtu 1500 qdisc pfifo_fast state UNKNOWN group default qlen 100
    link/generic 00:00:00:00:00:00:00:00 brd 00:00:00:00:00:00:00:00
    inet 16.255.255.254/8 brd 16.255.255.255 scope global oip1
       valid_lft forever preferred_lft forever
Ping the emulated upstream router from UE
At first, it may take some time to get successful ping response due to the
delays in SPGWU processing ARP packets.
$ ping -I oip1 13.1.1.254 -c 3
PING 13.1.1.254 (13.1.1.254) from 16.255.255.254 oip1: 56(84) bytes of data.
64 bytes from 13.1.1.254: icmp_seq=1 ttl=64 time=31.6 ms
64 bytes from 13.1.1.254: icmp_seq=2 ttl=64 time=16.5 ms
64 bytes from 13.1.1.254: icmp_seq=3 ttl=64 time=44.3 ms

--- 13.1.1.254 ping statistics ---
3 packets transmitted, 3 received, 0% packet loss, time 2002ms
rtt min/avg/max/mdev = 16.567/30.841/44.333/11.349 ms

$ ping -I oip1 8.8.8.8 -c 3
PING 8.8.8.8 (8.8.8.8) from 16.255.255.254 oip1: 56(84) bytes of data.
64 bytes from 8.8.8.8: icmp_seq=1 ttl=54 time=39.4 ms
64 bytes from 8.8.8.8: icmp_seq=2 ttl=54 time=66.5 ms

--- 8.8.8.8 ping statistics ---
3 packets transmitted, 2 received, 33% packet loss, time 2002ms
rtt min/avg/max/mdev = 39.416/52.962/66.509/13.548 ms
That’s it. Currently it’s not possible to send traffic to destinations on the Internet.
Uninstall COMAC-in-a-Box
If you're done with your testing, the easiest way to remove a CiaB installation
is to use the make clean target. If you want to remove the COMAC components
only for testing your patchsets on OMEC helm charts or OMEC images, run
make reset-test target and then make again to reinstall.
Getting help
Report any problems to hyunsun on the CORD Slack channel.